
开始使用Spring WebFlux
传统的Spring MVC的方式,每个连接使用一个从线程池拿出来的线程进行处理,会阻塞。请求线程会一直等到工作完成才会处理下一个请求。 随着业务规模的增长,这种模式并不能很好的适应,尤其是比较慢的线程,回到线程池的速度比较慢,影响之后的请求处理。虽然这是过去10年来Web应用开发的模式,但现在该改变了。 现在随着物联网的到来,很多程序和机器通过API交互,而不是通过给人看的页面,访问数量比原来大大提升,异步Web应用的出现,可以用很少的线程(一般等于CPU核心数量)就处理大量的请求: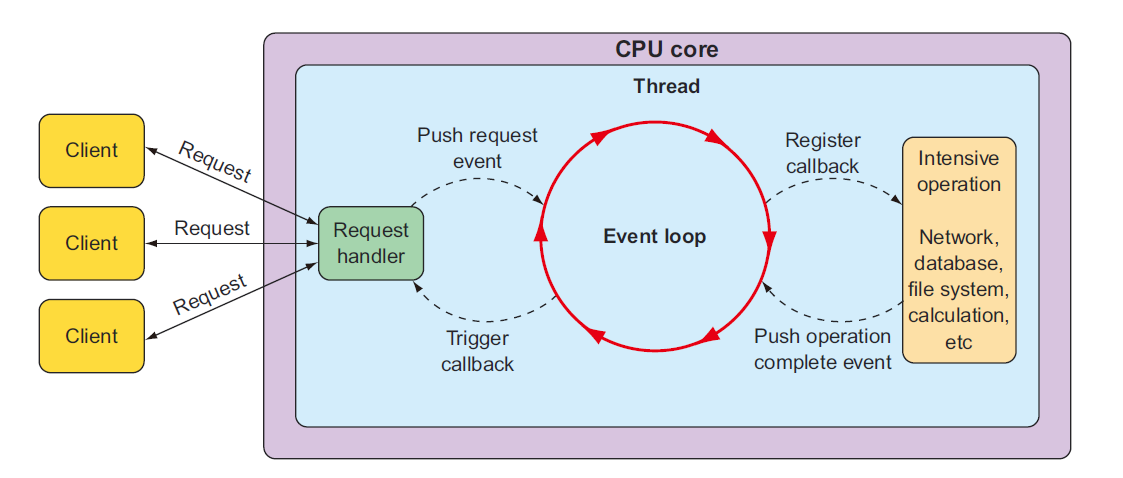 在一个事件循环中,所有东西都被当成一个事件处理,事件包含请求和回调函数。当一个开销很大的需求发生的时候,事件循环给那个事件注册一个回调函数,然后去并行处理,之后去处理其他事件。
当那个开销很大的事件完成操作的时候,又会像一个普通时间那样加入事件循环,就像普通的请求一样,事件循环拿到这个事件后再继续以上工作。
Spring 5 新增了基于这个机制和具体实现的Reactor库,可以应对高并发的组件 -- Spring WebFlux。
在一个事件循环中,所有东西都被当成一个事件处理,事件包含请求和回调函数。当一个开销很大的需求发生的时候,事件循环给那个事件注册一个回调函数,然后去并行处理,之后去处理其他事件。
当那个开销很大的事件完成操作的时候,又会像一个普通时间那样加入事件循环,就像普通的请求一样,事件循环拿到这个事件后再继续以上工作。
Spring 5 新增了基于这个机制和具体实现的Reactor库,可以应对高并发的组件 -- Spring WebFlux。
Spring WebFlux 简介
Spring WebFlux被引入为一个单独的Framework组件,里边借鉴了很多Spring MVC中的代码。可以认为是平行与Spring MVC的,可以看原书271页,介绍了Spring 5中所有Web开发的组件构成图。 Spring MVC于Spring框架2.5版的时候引入,基于Servlet API,底层是一个Servlet 容器(比如Tomcat),而Spring WebFlux是一个平行的体系,基于Reactive HTTP API(和Servlet API提供的功能一样,然而却是响应式的),然而由于毕竟不基于Servlet,所以无需Servlet容器,可以运行于所有非阻塞的,规范高于Servlet 3.1版的Web容器内。 需要注意是最上边,Spring MVC的一些注解依然可以在Spring WebFlux中使用,此外Spring WebFlux还提供了另外一套Router functions可供使用。 要使用Spring WebFlux,意味着不能使用Spring Web MVC,所以要将spring-boot-starter-web替换成新的依赖:
<dependency>
    <groupId>org.springframework.boot</groupId>
    <artifactId>spring-boot-starter-webflux</artifactId>
</dependency>
当你使用WebFlux的时候,内置的集成Web服务器不是Tomcat,而是Netty,Netty是异步以事件驱动的Web服务程序,非常适合Spring WebFlux。
与Spring MVC不同的是,Spring WebFlux的控制器方法接受的不是请求中的参数,返回的也不是视图名称,都是响应类型,也就是Flux和Mono,此外也能处理RxJava的类型,比如Observable,Single,Completable。
当然,Spring MVC的控制器也可以通过配置来返回Flux或者Mono类型,其中真正的差异不再表面,而是在背后的处理,Spring MVC对于Flux和Mono依然采取传统的多线程模型,而Spring WebFlux则是基于事件驱动。
原书这里是用前边的例子直接修改,我这里也直接新创建一个项目,依然采用原来的Student和Course数据表。
Spring WebFlux 控制器
到https://start.spring.io/,选上2.1.4版的Spring Boot,依赖如下:- Reactive Web: Reactive web applications with Spring WebFlux and Netty
- Rest Repositories: Exposing Spring Data repositories over REST via Spring Data REST
- Thymeleaf: Thymeleaf templating engine
- JPA: Persist data in SQL stores with Java Persistence API using Spring Data and Hibernate
- MySQL: MySQL JDBC driver
package cc.conyli.webflux.controller;

import cc.conyli.webflux.domain.Student;
import cc.conyli.webflux.repository.StudentRepo;
import lombok.extern.slf4j.Slf4j;
import org.springframework.beans.factory.annotation.Autowired;
import org.springframework.http.HttpStatus;
import org.springframework.http.ResponseEntity;
import org.springframework.web.bind.annotation.*;

import java.util.List;
import java.util.Optional;

@Slf4j
@RestController
@RequestMapping(path = "/myapi/students", produces = "application/json")
@CrossOrigin("*")
public class StudentRestController {

    private StudentRepo studentRepo;

    @Autowired
    public StudentRestController(StudentRepo studentRepo) {
        this.studentRepo = studentRepo;
    }


    @GetMapping
    public List<Student> showStudentList() {
        return studentRepo.findAll();
    }


    @GetMapping("/{id}")
    public ResponseEntity<Student> getStudent(@PathVariable("id") int id) {
        Optional<Student> student = studentRepo.findById(id);
        if (student.isPresent()) {
            return new ResponseEntity<>(student.get(), HttpStatus.OK);
        } else {
            return new ResponseEntity<>(null, HttpStatus.NOT_FOUND);
        }
    }

    @PostMapping(consumes = "application/json")
    @ResponseStatus(HttpStatus.CREATED)
    public Student addStudent(@RequestBody Student student) {
        log.info(student.toString());
        return studentRepo.save(student);
    }


    @PutMapping(path = "/{id}", consumes = "application/json")
    public ResponseEntity<Student> replaceStudent(@PathVariable("id") int id, @RequestBody Student student) {
        Optional<Student> targetStudent = studentRepo.findById(id);
        if (targetStudent.isPresent()) {
            Student theStudent = targetStudent.get();
            theStudent.setFirstName(student.getFirstName());
            theStudent.setLastName(student.getLastName());
            theStudent.setCourseId(student.getCourseId());
            return new ResponseEntity<>(studentRepo.save(theStudent), HttpStatus.CREATED);
        } else {
            return new ResponseEntity<>(null, HttpStatus.NOT_FOUND);
        }
    }

    @PatchMapping(path = "/{id}", consumes = "application/json")
    public ResponseEntity<Student> patchStudent(@PathVariable("id") int id, @RequestBody Student student) {
        Optional<Student> targetStudent = studentRepo.findById(id);
        if (targetStudent.isPresent()) {
            Student theStudent = targetStudent.get();
            if (student.getFirstName() != null) {
                theStudent.setFirstName(student.getFirstName());
            }
            if (student.getLastName() != null) {
                theStudent.setLastName(student.getLastName());
            }
            if (student.getCourseId() != null) {
                theStudent.setCourseId(student.getCourseId());
            }
            return new ResponseEntity<>(studentRepo.save(theStudent), HttpStatus.CREATED);
        } else {
            return new ResponseEntity<>(null, HttpStatus.NOT_FOUND);
        }
    }

    @DeleteMapping(path = "/{id}")
    public ResponseEntity<Student> removeStudent(@PathVariable("id") int id) {
        Optional<Student> targetStudent = studentRepo.findById(id);
        if (targetStudent.isPresent()) {
            studentRepo.delete(targetStudent.get());
            return new ResponseEntity<>(null, HttpStatus.NO_CONTENT);
        }else {
            return new ResponseEntity<>(null, HttpStatus.NOT_FOUND);
        }
    }
}
这个控制器现在就是用来对比了,新创建一个FluxController,来看看新的方法下如何使用,先来最简单的,查询全部学生:
package cc.conyli.webflux.controller;

import cc.conyli.webflux.domain.Student;
import cc.conyli.webflux.repository.StudentRepo;
import org.springframework.beans.factory.annotation.Autowired;
import org.springframework.web.bind.annotation.GetMapping;
import org.springframework.web.bind.annotation.RequestMapping;
import org.springframework.web.bind.annotation.RestController;
import reactor.core.publisher.Flux;

@RestController
@RequestMapping(path = "/flux")
public class FluxController {

    private StudentRepo studentRepo;

    @Autowired
    public FluxController(StudentRepo studentRepo) {
        this.studentRepo = studentRepo;
    }


    @GetMapping("/students")
    public Flux<Student> getStudents() {
        return Flux.fromIterable(studentRepo.findAll());
    }
}
访问这个地址,返回的是一串所有学生的JSON。这里还可以改进一些,如果StudentRepo返回的直接就是Flux该多好,这就需要修改一下神奇接口:
package cc.conyli.webflux.repository;

import cc.conyli.webflux.domain.Student;
import org.springframework.data.repository.reactive.ReactiveCrudRepository;


public interface StudentRepo extends ReactiveCrudRepository<Student, Integer> {

}
之后就无需在控制器里创建Flux,而是直接使用了:
@GetMapping("/students")
public Flux<Student> getStudents() {
    return studentRepo.findAll();
}
这后边还可以跟.take()之类的方法来创建最终所需的FLux。现在启动项目,访问这个地址,可以发现返回了全部Student的JSON,和之前的控制器,在表面上看起来没有什么不同,使用了同样的注解。
你可能注意到,这个Flux并没有被订阅,实际上框架帮你调用了.subscribe()方法,即使数据库的数据还没有返回,这个方法也会立刻返回。
@GetMapping("/students/{id}")
public Mono<Student> getSingleStudent(@PathVariable("id") int id) {
    return studentRepo.findById(id);
}
但是如此修改并运行之后发现报错:Reactive Repositories are not supported by JPA.
根据StackOverflow的回答这是因为数据库不支持响应式,目前从start.spring.io来看,只有Redis,MongoDB和Cassandra支持响应式。
我们一开始的那种写法,实际还是同步取得数据,再将其包装进Flux中。但是由于数据库不支持,现在只能先改成最上边的那种写法了。
但是添加的方法就没法写了,只能按照新的写(看来要去学MongoDB了):
@PostMapping(path = "/students", consumes = "application/json")
@ResponseStatus(HttpStatus.CREATED)
public Mono<Student> addStudent(@RequestBody Mono<Student> studentMono) {
    return studentRepo.saveAll(studentMono).next();
}
这个相比原来的添加,传入的参数也可以直接匹配为Mono类型,然后调用saveAll()方法,这是将一个Flux或者Mono中的全部内容都储存进数据库的方法。由于我们保存的是Mono只有一个数据,因此可以调用.next()来取第一个数据,也就是保存的数据,取出的是一个Mono对象,符合返回值要求。
再往后的删改也可以类推了,只要注意参数类型和返回类型即可。
现在的重点应该还是用一些支持反应式的数据库来操作看看。
上边就是原始的API的编写方法,现在Web处理已经是基于事件驱动的了,如果能够将数据库也改成响应式的,整个Web应用就彻底是响应式的了。
Spring WebFlux 函数式编程写法
Spring 5提供了针对WebFlux的函数式编程方法,来编写这些API。使用起来不像框架,而像是使用一个库,把请求映射到处理请求的代码上去,主要使用以下四个类型:RequestPredicate,声明要被处理的请求的种类RouterFunction,声明一个请求如何被转发到处理请求的代码上ServerRequest,代表一个HTTP请求,包含头部信息和请求体ServerResponse,代表一个HTTP响应,包含头部信息和响应体
package cc.conyli.webflux.config;

import org.springframework.context.annotation.Bean;
import org.springframework.context.annotation.Configuration;
import org.springframework.web.reactive.function.server.RouterFunction;

import static org.springframework.web.reactive.function.server.RequestPredicates.GET;
import static org.springframework.web.reactive.function.server.RouterFunctions.route;
import static org.springframework.web.reactive.function.server.ServerResponse.ok;
import static reactor.core.publisher.Mono.just;

@Configuration
public class FluxConfig {

    @Bean
    public RouterFunction<?> helloRouterFuntion() {
        return route(GET("/hello"), request -> ok().body(just("Hello World"), String.class));
    }
}
这里使用了静态导入,说明被导入的类里全都是静态方法。详细解释一下:
Router-Function<?>这个类型,像之前说的一样,是一个映射关系,由route方法返回。route方法里的第一个参数表示对/hello路径的访问,第二个参数表示把这个路径映射到的处理这个访问的方法。GET("/hello")是一个RequestPredicate下边的类,声明了一个匹配GET请求,路径是/hello的RequestPredicate对象。- 第二个参数是处理请求的方法,虽然没有显式指定,但这个方法的参数是一个
ServerRequest对象,返回值是一个ServerResponse对象,其中的方法都是在对这个请求进行处理。 ok()表示响应码200,然后是body()方法内部的填充响应体的部分,实体部分由just来构成的Flux流填充,然后指定对应的数据类型即可。
andRoute()方法即可:
@Bean
public RouterFunction<?> helloRouterFuntion() {
    return route(GET("/hello"), request -> ok().body(just("Hello World"), String.class))
            .andRoute(GET("/bye"), serverRequest -> ok().body(just("goodbye"), String.class));
}
这里启动服务的时候,发现404错误,查看Spring Boot启动的日志,发现依然运行于Tomcat之上,查看包还依然有集成的Tomcat包。
猜想可能是依赖的问题,逐个关闭依赖,只剩下web-flux,发现问题解决了,日志也输出Netty运行的消息。然后一个一个打开,最后发现竟然是spring-boot-starter-data-rest依赖Tomcat,看来如果要自行编写响应式Web,就不能依靠这个了。
如果要把原来的代码改写成函数式编程的方法,可以不用编写控制器,但是由于数据库还不支持Jpa,无法直接返回Mono类型,这里还写不出来,看来确实需要使用NoSQL数据库了。
之后使用WebTestClient进行测试的部分,也先放一放,看一看后边大概的如何消费响应式的REST API。
消费响应式REST API
在第七章使用了RestTemplate来消费API,这个东西只能处理非响应式的API。如果依然要使用RestTemplate,那么从API获取的数据需要封装成Flux或者Mono,在发送请求的时候,需要将Flux或者Mono数据解包成原始数据一个一个通过RestTemplate发送。
Spring 5提供了WebClient,可以在访问API的时候,直接发送流数据。
不过WebClient的使用方式和RestTemplate很不同,提供了一系列接口进行声明式的编程方法,通常按照这个流程进行使用:
- 创建一个WebClient实例或者注入一个实例
- 定义请求的HTTP方法
- 定义URI和头部信息
- 提交请求
- 接受(消费)响应
获取资源
获取资源的写法和原来的指令式完全不同:@Test
public void testConnect() {
Mono<Employee> employeeMono = WebClient.create().get().uri("http://localhost:8888/api/employees/{id}", 3).retrieve().bodyToMono(Employee.class);
StepVerifier.create(employeeMono)
.expectNextMatches(s -> s.getLastName().equals("33") && s.getFirstName().equals("3") && s.getEmail().equals("3"))
.verifyComplete();
}
这里用声明的方式编写了一个请求,调用WebClient的静态方法.create()创建一个请求,使用get和uri方法表示往指定地址发GET请求,还可以传入拼接uri的参数。
后边的retrieve表示执行请求,然后bodyToMono是将响应体内容按照其中的类型封装成Mono<T>。
用测试就可以发现确实返回了其中的对象。获取一批数据很类似,转换成Flux即可:
@Test
public void testFluxConnect() {
    Flux<Employee> employeeFlux = WebClient.create().get().uri("http://localhost:8888/api/employees").retrieve().bodyToFlux(Employee.class);

    employeeFlux.subscribe(s -> log.info(s.toString()+"-------------------------"));

    StepVerifier.create(employeeFlux)
            .expectNextMatches(s -> s.getFirstName().equals("3"))
            .expectNextMatches(s -> s.getFirstName().equals("2"))
            .expectNextMatches(s -> s.getFirstName().equals("3"))
            .expectNextMatches(s -> s.getFirstName().equals("45"))
            .expectNextMatches(s -> s.getFirstName().equals("5"))
            .expectNextMatches(s -> s.getFirstName().equals("6"))
            .expectNextMatches(s -> s.getFirstName().equals("66"))
            .verifyComplete();
}
经过这两个简单的试验,发现只订阅是不会输出内容的,只有实际取了数据,才会发送到订阅对象。
由于我们的URI写死了,很不方便,可以定义一个基础的URI,然后进行拼接,整个类就像这样:
package cc.conyli.webflux.consumer;

import cc.conyli.webflux.domain.Employee;
import lombok.extern.slf4j.Slf4j;
import org.junit.Test;
import org.springframework.web.reactive.function.client.WebClient;
import reactor.core.publisher.Flux;
import reactor.core.publisher.Mono;
import reactor.test.StepVerifier;

@Slf4j
public class WebClientConsumer {

    private WebClient webClient = WebClient.create("http://localhost:8888");

    @Test
    public void testConnect() {
        Mono<Employee> employeeMono = webClient.get().uri("/api/employees/{id}", 3).retrieve().bodyToMono(Employee.class);

        employeeMono.subscribe(s -> log.info(s.toString()));

        StepVerifier.create(employeeMono)
                .expectNextMatches(s -> s.getLastName().equals("33") && s.getFirstName().equals("3") && s.getEmail().equals("3"))
                .verifyComplete();
    }

    @Test
    public void testFluxConnect() {
        Flux<Employee> employeeFlux = webClient.get().uri("/api/employees").retrieve().bodyToFlux(Employee.class);

        employeeFlux.subscribe(s -> System.out.println("---------------------------"+s.toString()+"-------------------------"));

        StepVerifier.create(employeeFlux)
                .expectNextMatches(s -> s.getFirstName().equals("3"))
                .expectNextMatches(s -> s.getFirstName().equals("2"))
                .expectNextMatches(s -> s.getFirstName().equals("3"))
                .expectNextMatches(s -> s.getFirstName().equals("45"))
                .expectNextMatches(s -> s.getFirstName().equals("5"))
                .expectNextMatches(s -> s.getFirstName().equals("6"))
                .expectNextMatches(s -> s.getFirstName().equals("66"))
                .verifyComplete();
    }
}
可以加上一个时间控制,让请求在一定时间内得不到数据也返回来,由于此时结果已经是一个FLux或者Mono,因此可以使用之前的方法加上限时。先修改Employee的控制器,在返回之前让线程睡4秒,然后修改:
@Test
public void testFluxConnect() {
    Flux<Employee> employeeFlux = webClient.get().uri("/api/employees").retrieve().bodyToFlux(Employee.class);

    employeeFlux.timeout(Duration.ofSeconds(5)).subscribe(s -> System.out.println("---------------------------"+s.toString()+"-------------------------"));

    StepVerifier.create(employeeFlux)
            .expectNextMatches(s -> s.getFirstName().equals("3"))
            .expectNextMatches(s -> s.getFirstName().equals("2"))
            .expectNextMatches(s -> s.getFirstName().equals("3"))
            .expectNextMatches(s -> s.getFirstName().equals("45"))
            .expectNextMatches(s -> s.getFirstName().equals("5"))
            .expectNextMatches(s -> s.getFirstName().equals("6"))
            .expectNextMatches(s -> s.getFirstName().equals("66"))
            .verifyComplete();
}
运行之后可以看到测试会卡住4秒钟,等待传回了信息之后,才会继续完成测试。
POST资源
POST需要发送一个Mono类型的数据给指定的API:@Test
public void postConnect() {
Employee employee = new Employee("test1", "test1", "test@test1.com");
Mono<Employee> employeeMono = Mono.just(employee);
Mono<Employee> employeeMono1 = webClient.post().uri("/api/employees").body(employeeMono, Employee.class).retrieve().bodyToMono(Employee.class);
System.out.println("*********************************");
employeeMono1.subscribe(s -> log.info("-----------" + s.toString() + "-----------"));
System.out.println("*********************************");
}
这里发现代码很好写,但是不知道为何订阅之后没有实际的数据流通,也没有实际执行POST行为。后来发现只要调用流的.block方法就可以了,实际获取一下数据,就发送或者提交请求了。
如果没有Mono,可以使用.syncBody(employee)方法来直接进行转换。
删除资源
发送DELETE请求即可:@Test
public void deleteConnect() {
Mono<Employee> employeeMono = webClient.delete().uri("/api/employees/{id}", 12).retrieve().bodyToMono(Employee.class);
System.out.println("*********************************");
log.info(employeeMono.block().toString());
System.out.println("*********************************");
}
这里删除资源我写的API是返回被删除的资源,如果不返回任何资源,需要修改成bodyToMono(Void.class)
这个也是一样,要取一下block才会执行,这一点还得好好理解一下。PUT方法也差不多,这里就不写了。
处理错误
之前发送的请求都是没有问题的,如果404或者500错误该怎么办呢,有一个,onStatus()方法可以进行处理,第一个参数是某种响应错误,第二个是处理方法,参数是ClientResponse,返回Mono<Throwable>。
Mono<Employee> employeeMono = webClient.get().uri("/api/employees/{id}", 3)
            .retrieve()
            .onStatus(HttpStatus::is5xxServerError, clientResponse -> Mono.just(new UnknownEmployeeException()))
            .bodyToMono(Employee.class);
其中UnknownEmployeeException()需要自行编写。
这里异常处理在订阅的时候如何处理,也需要看看。书里只说了订阅一个处理普通数据和异常的两个订阅者,但没有说如何具体编写,可能是采用一些区分流的技巧。
如果要详细确定响应码,可以写成:
.onStatus(status -> status == HttpStatus.NOT_FOUND,
response -> Mono.just(new UnknownEmployeeException()))
用.exchange()方法替代retrieve()方法
.retrieve()方法返回一个ResponseSpec对象,是比较简单的对象,如果想要取得响应的头部信息,cookie等,就不能使用.retrieve()方法,而要使用.exchange()方法。
.exchange()方法返回的是一个Mono<ClientResponse>对象,可以针对Mono进行操作,比如:
Mono<Employee> employeeMono = webClient.get().uri("/api/employees/{id}", 20)
        .exchange()
        .flatMap(clientResponse -> clientResponse.bodyToMono(Employee.class));
这个写法与原来的.retrieve.bodyToMono(Employee.class)是等价的,但是可进行的操作就更多了,比如:
Mono<Employee> employeeMono = webClient.get().uri("/api/employees/{id}", 20)
        .exchange()
        .flatMap(clientResponse -> {
            if (clientResponse.headers().header("NA").contains(true)) {
                return Mono.empty();
            } else {
                return Mono.just(clientResponse);
            }
        })
        .flatMap(cr -> cr.bodyToMono(Employee.class));
可以连续返回不同类型的Mono,不断进行处理生成新的Mono,这中间可以根据头部信息或者各种信息来进行逻辑和业务处理。
反应式API的安全问题
Spring Security原本是基于Servlet 的 Filter技术,但是由于现在不使用Servlet了,是不是就不能用了呢。 Spring Security 5.0使用了WebFilter技术,一套模拟Servlet Filter的技术,可以和WebFlux相结合,更方便的是,依赖不变,依然只需要导入:
<dependency>
    <groupId>org.springframework.boot</groupId>
    <artifactId>spring-boot-starter-security</artifactId>
</dependency>
如果项目中使用了WebFlux,就会自动应用WebFilter。
书里指出了一些不同,比如注解@EnableWebFluxSecurity,没有重写configure()方法,ServerHttpSecurity替代原来的HttpSecurity对象。
还有使用用户名的验证,也先看下来,有机会再测试。现在当务之急还是配置一个反应式的NoSQL数据库。